

Strawberry Swiss Roll: A Pillowy Pink Dream
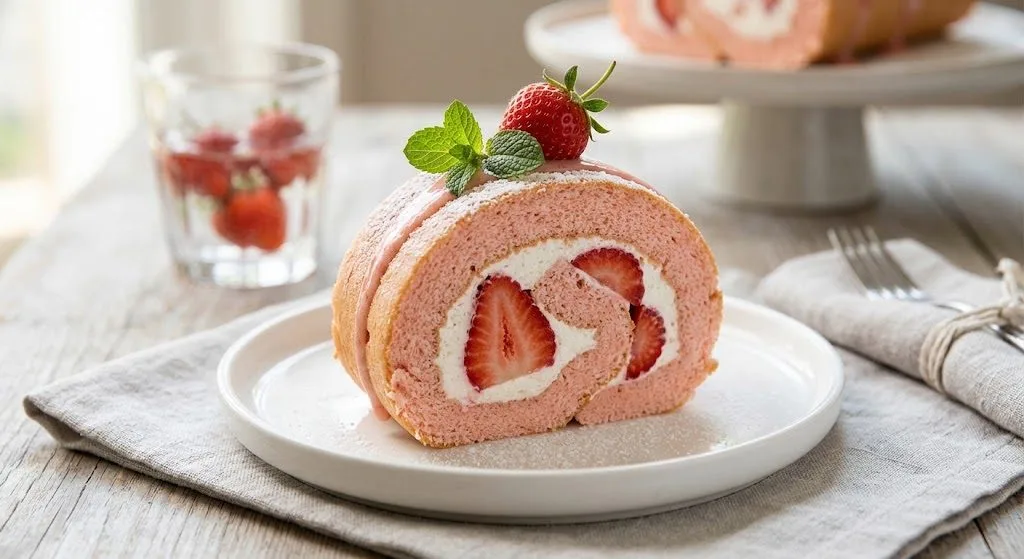
A bakery-worthy centerpiece featuring a pastel-pink, cloud-soft chiffon sponge rolled around luscious vanilla whipped cream and sweet, ruby-red diced strawberries with a crack-free warm-roll technique.


There is something undeniably magical about a perfectly swirled Swiss roll. Slicing into the delicate, pastel-pink sponge to reveal a neat, hypnotic spiral of cloud-like vanilla whipped cream and ruby-red fresh strawberries is a visual feast before you even take your first bite. While many home bakers feel intimidated by rolled cakes—fearing the dreaded sponge crack or a collapsed roll—this stunning Strawberry Swiss Roll recipe is exceptionally approachable. By utilizing an ultra-flexible chiffon cake base and employing a clever "warm-rolling" technique, you can easily achieve a bakery-worthy showstopper that is as soft, pillowy, and tender as a cloud.
The Unexpected History of the Swiss Roll
Despite its iconic geographic moniker, the Swiss roll did not actually originate in Switzerland. Food historians trace the roots of this rolled sponge confection back to 19th-century Central Europe—most likely Austria or Slovenia—where it evolved alongside classic European tea-time bakes such as the Battenberg cake and Victoria sponge.
The pastry made its way across the Atlantic shortly thereafter. The earliest known American print reference appeared in an 1852 culinary journal in Utica, New York, where it was simply termed "Jelly Cake." Over subsequent decades, the terminology shifted through regional variations like "roll jelly cake" and "rolled jelly cake" before Americans ultimately coined the term "jelly roll," while British and international patisseries popularized the elegant designation "Swiss roll."
What Makes This Dish Special
This recipe swaps the dense, fragile texture of traditional Genoise sponge for an oil-enriched chiffon cake. Whipping the egg whites into a stiff, glossy meringue and gently folding them into an emulsified yolk, milk, and oil batter produces an extraordinarily moist, featherlight sponge with exceptional elasticity. Combined with pre-rolling the sheet cake while still warm, the sponge effortlessly forms a tight, graceful spiral without snapping, tearing, or cracking.
Component & Flavor Architecture
| Layer | Key Elements | Culinary Role & Texture Profile |
|---|---|---|
| Pillowy Pink Chiffon Sponge | Separated egg whites/yolks, cake flour, neutral oil, milk, touch of pink food gel | Ultra-flexible, moist crumb that bends without snapping; subtle vanilla aroma and pastel-pink tint. |
| Chilled Vanilla Whipped Cream | Cold heavy cream (36%+ fat), powdered sugar, pure vanilla extract | Light, velvety dairy cloud that cushions the cake layers without weighing down the delicate crumb. |
| Fresh Strawberry Mosaic | Fresh ripe strawberries, diced small into bite-sized pieces | Introduces bursts of juicy, tart sweetness that cut cleanly through the rich dairy cream. |
| Piped Garnishes | Reserved whipped cream rosettes, fresh berry halves, mint leaves | Adds visual height, elegance, and pristine bakery showcase presentation. |
Critical Technique: The Warm-Roll Sponge Training
Roll the cake while it is still warm: As soon as the sponge emerges from the oven and rests for 5 minutes, turn it out onto fresh parchment paper and roll it into a tight cylinder while still warm and pliable. Cooling in this rolled position imparts "crumb memory"—training the sponge structure to hold a tight spiral. If you wait until the cake is fully cold to roll it, the set gluten fibers will resist bending and cause unsightly cracks.
Pro Tips & Pastry Chef Insights
- 1. Neutralize Yolk Yellow for True Pastel Pink: Egg yolks possess natural yellow pigments. Adding red food coloring directly produces an orange hue. Use a blue-toned pink food gel or add an infinitesimal pinprick of violet/purple gel to neutralize yellow tones and achieve an authentic pastel baby pink.
- 2. Watch the Oven Closely: Chiffon sheet cakes bake in just 12 to 13 minutes. An overbaked sponge dries out quickly and loses the moisture needed for crack-free rolling. Remove the sheet as soon as the top springs back lightly when touched.
- 3. Small Dice over Slices: Dice fresh strawberries into small 1/4-inch pieces rather than slices. When carving the chilled Swiss roll, large strawberry slices catch on the knife blade and tear through the neat swirl, while small diced berries slice effortlessly.
- 4. Leave a 2-Inch Margin at the End: When spreading whipped cream, leave a 2-inch border bare at the far edge. As you roll the cake forward, the filling naturally moves ahead of the spiral; leaving this margin prevents cream from spilling out the seam.
- 5. Overnight Chill for Clean Slices: Wrap the rolled cake snugly in plastic wrap and chill for at least 4 hours, preferably overnight. This rest hydrates the sponge and firms the whipped cream so every cross-section slice reveals a crisp, pristine swirl.
Serving, Pairings & Storage Notes
Before serving, slice off the very ends of the roll with a warm, sharp serrated knife to reveal the flawless interior spiral. Wipe the knife clean between every slice for picture-perfect bakery presentation.
Beverage Pairings: Complements hot Earl Grey tea with lemon, freshly steeped chamomile, iced matcha lattes, or chilled dry sparkling Rosé. Store covered in the refrigerator for up to 3 days.
Ingredients
-
4 EggsSubstitutes for Eggs:Flax Egg Ratio: 1 tbsp ground flax + 3 tbsp water = 1 egg (Vegan)
-
100Substitutes for Granulated Sugar:Honey Ratio: 3/4 cup honey = 1 cup sugarMaple Syrup Ratio: 3/4 cup syrup = 1 cup sugar
-
50Substitutes for Granulated Sugar:Honey Ratio: 3/4 cup honey = 1 cup sugarMaple Syrup Ratio: 3/4 cup syrup = 1 cup sugar
-
1/4 tsp
-
3 1/4 tbsp DairySubstitutes for Whole Milk:Almond Milk Ratio: 1:1 (Dairy-free)Oat Milk Ratio: 1:1 (Dairy-free)
-
3 2/3 tbsp
-
1 tspSubstitutes for Vanilla Extract:Maple syrup Ratio: 1:1
-
1 cup Gluten
-
1 tspSubstitutes for Baking Powder:1/4 tsp baking soda + 1/2 tsp cream of tartar Ratio: for 1 tsp baking powder
-
1–2
-
1 1/2 DairySubstitutes for Heavy Cream:Full Fat Coconut Milk Ratio: 1:1 (Dairy-free)Milk + Butter Ratio: 3/4 cup milk + 1/4 cup melted butter = 1 cup heavy cream
-
5 tbspSubstitutes for Granulated Sugar:Honey Ratio: 3/4 cup honey = 1 cup sugarMaple Syrup Ratio: 3/4 cup syrup = 1 cup sugar
-
1 tspSubstitutes for Vanilla Extract:Maple syrup Ratio: 1:1
-
250Substitutes for Fresh Strawberries:Raspberries Ratio: 1:1Blueberries Ratio: 1:1
-
4–6Substitutes for Fresh Strawberries:Raspberries Ratio: 1:1Blueberries Ratio: 1:1
-
1 tbsp
Watch How to Make It
1. Whip the Pink Meringue and Prepare the Yolk Base
Stiff Peak Precision: Ensure your meringue bowl and beaters are completely free of oil or yolk traces so the whites achieve maximum volume and firm, glossy peaks.
2. Fold Batter, Spread Evenly & Bake the Sponge
Do Not Overbake: The thin chiffon sponge bakes fast. Keep a close watch around 11–12 minutes; overbaking dries out the sponge and causes cracking during rolling.
3. The Crucial Warm-Roll Sponge Training
Crumb Memory: Rolling while the sponge is warm trains the crumb structure to bend smoothly without tearing later when filled with whipped cream.
4. Whip the Cream Filling & Assemble the Strawberry Spiral
The 2-Inch Border: Leaving a 2-inch bare edge prevents excess cream from squishing out of the seam as you roll the cylinder forward.
5. Roll, Wrap, Chill Overnight & Garnish with Berries
Pristine Slices: Wipe your knife clean with a damp warm towel between each slice to keep the white cream swirl and pink sponge perfectly distinct.
All Steps Completed!
You've successfully finished cooking this recipe.
Directions
Step 1: Whip the Pink Meringue and Prepare the Yolk Base
Preheat your oven to 350°F (175°C) and line a 12x17-inch rimmed baking sheet with parchment paper. In a thoroughly clean, grease-free bowl, beat the 4 egg whites and cream of tartar on medium speed until frothy like cappuccino foam. Gradually sprinkle in the 100g of sugar one tablespoon at a time, beating until soft peaks form. Add 1–2 drops of pink gel food coloring and beat until stiff, glossy peaks hold their shape. In a separate bowl, whisk the 4 egg yolks, 50g sugar, milk, oil, and vanilla extract until smooth. Sift the cake flour and baking powder into the yolk mixture and whisk gently just until no dry pockets remain.
Stiff Peak Precision: Ensure your meringue bowl and beaters are completely free of oil or yolk traces so the whites achieve maximum volume and firm, glossy peaks.
Step 2: Fold Batter, Spread Evenly & Bake the Sponge
Gently fold one-third of the pink meringue into the yolk batter with a silicone spatula to lighten its consistency. Add the remaining meringue in two additions, gently folding with sweeping under-and-over motions until the color is uniform with zero white streaks remaining. Pour the batter onto the prepared baking sheet and use an offset spatula to smooth it into an even layer from corner to corner. Gently tap the pan on the counter twice to release large air pockets. Bake at 350°F (175°C) for 12 to 13 minutes until the surface springs back lightly to a gentle touch.
Do Not Overbake: The thin chiffon sponge bakes fast. Keep a close watch around 11–12 minutes; overbaking dries out the sponge and causes cracking during rolling.
Step 3: The Crucial Warm-Roll Sponge Training
Allow the baked cake to rest in the pan for 5 minutes. Run a thin spatula or knife around the outer edges to release. Invert the warm cake onto a fresh, clean sheet of parchment paper and gently peel off the baked bottom parchment. Trim a thin slice off the two shorter ends for clean edges. While the sponge is still warm and pliable, roll it up snugly inside the parchment paper from one short end to the other into a tight cylinder. Set the rolled cake on a wire rack and let it cool completely to room temperature in this rolled shape.
Crumb Memory: Rolling while the sponge is warm trains the crumb structure to bend smoothly without tearing later when filled with whipped cream.
Step 4: Whip the Cream Filling & Assemble the Strawberry Spiral
In a chilled mixing bowl, whip the cold heavy cream, powdered sugar, and vanilla extract until firm peaks form that hold their shape. Carefully unroll the cooled cake log. Spread the majority of the whipped cream evenly across the sponge, setting aside 1/2 cup for piping top decorations, and leaving a 2-inch border bare at the far end. Scatter the diced strawberries evenly over the cream, gently pressing them into the cream layer so they stay anchored.
The 2-Inch Border: Leaving a 2-inch bare edge prevents excess cream from squishing out of the seam as you roll the cylinder forward.
Step 5: Roll, Wrap, Chill Overnight & Garnish with Berries
Carefully roll the sponge back up around the filling into a neat, snug log. Wrap the Swiss roll tightly in plastic wrap to maintain its cylindrical shape and refrigerate for a minimum of 4 hours, preferably overnight. When ready to serve, unwrap the cake and slice 1/2 inch off both ends to reveal the pristine, picture-perfect spiral. Pipe reserved whipped cream rosettes along the top, crown with fresh strawberry halves, and slice with a warm serrated knife.
Pristine Slices: Wipe your knife clean with a damp warm towel between each slice to keep the white cream swirl and pink sponge perfectly distinct.
What's Your Reaction?

The team behind reviewing, curating, and preparing community-submitted recipes and food content for publication on Recipinboard. We help ensure every submission is presented clearly, credited properly, and ready to be discovered by fellow food lovers.
Related Recipes
 Life Style
⏱ 60 mins
Life Style
⏱ 60 mins
Laing Bicol
Laing, or Pinangat in Bicol, is Bicol's pride - dried or fresh taro leaves slow-co...
 Filipino Breakfast
⏱ 17 mins
Filipino Breakfast
⏱ 17 mins
Chicken Inasal with Garlic Java Rice & Atchara
There are two kinds of grilled chicken in the Philippines. There's the one you eat...
 Asian Salads
⏱ 45 mins
Asian Salads
⏱ 45 mins
Kimchi — Easy Mak-Kimchi Style
If you have ever been intimidated by the complex process of making traditional Kor...
 Donuts, Churros & Fritters
⏱ 60 mins
Donuts, Churros & Fritters
⏱ 60 mins
Custard Cream Donuts — Classic Vanilla & Chocolate
Warm, soft, and bursting with rich, silky cream—there’s a reason custard donuts ar...
 Dinner Rolls & Buns
⏱ 50 mins
Dinner Rolls & Buns
⏱ 50 mins
Golden Cheesy Garlic Swirl Rolls (Bakery-Style Pull-Apart Bread)
Cloud-soft enriched milk dough swirled with fragrant garlic herb butter, layered w...
 Cookies & Shortbread
⏱ 40 mins
Cookies & Shortbread
⏱ 40 mins
NYC-Style Chunky Chocolate Chip Cookies (Classic, Red Velvet &...
Massive, gourmet Levain-style cookies featuring one master dough transformed into ...






Comments (0)