

Kimchi — Easy Mak-Kimchi Style
If you have ever been intimidated by the complex process of making traditional Korean kimchi, enter Mak-kimchi—the accessible, everyday kimchi delivering vibrant, complex, and tangy flavors in just 45 minutes of prep.
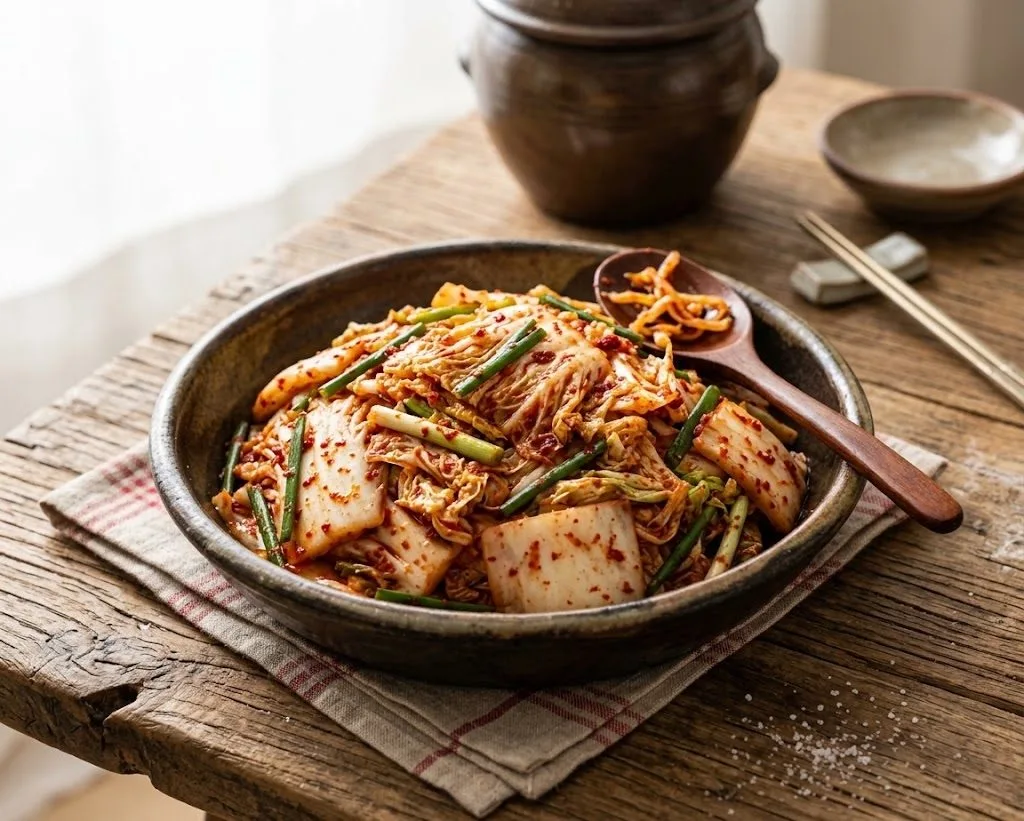

If you have ever been intimidated by the complex, days-long process of making traditional Korean kimchi, you are in the right place. While the classic whole-cabbage preparation is a beautiful culinary art form, it can often feel daunting for beginners. Enter Mak-kimchi—the accessible, everyday kimchi that delivers all the vibrant, complex, and tangy flavors you crave without the heavy lifting.
Whether you are pairing it with a simple steaming bowl of rice, adding a zesty kick to your midnight ramen, or serving it alongside golden, savory scallion pancakes, this recipe proves that making authentic Korean staple dishes at home is entirely within your reach.
The Tradition & Evolution of Fermentation
Kimchi is the undeniable cornerstone of Korean cuisine, with roots stretching back thousands of years. Originally, vegetables were heavily salted to preserve essential nutrients through the freezing, barren Korean winters. Over centuries, with the introduction of chili peppers to the Korean peninsula in the 17th century, kimchi underwent a culinary revolution—evolving into the spicy, vibrant, ruby-red fermented marvel we celebrate today.
The term Mak-kimchi literally translates to "carelessly" or "roughly" made kimchi. However, don't let the name fool you! It simply refers to the practical technique of chopping the Napa cabbage into bite-sized pieces prior to salting and seasoning. This contrasts with traditional Tongbaechu-kimchi, which requires laboriously stuffing chili paste between individual intact leaves of whole cabbage quarters.
What Makes This Dish Special
This variation democratizes the kimchi-making process for home kitchens. Pre-chopping the cabbage dramatically accelerates the brining window from many hours down to just 30 to 45 minutes.
Furthermore, the seasoning paste is swiftly pureed in a blender and tossed with the crisp cabbage like a fresh salad. It bypasses the most tedious, labor-intensive steps while yielding a tangy, probiotic-rich side dish that can be enjoyed delightfully fresh on day one, or fermented for deeper complexity over weeks.
Kimchi Styles: Mak-Kimchi vs. Traditional Tongbaechu
Understanding how Mak-kimchi compares to whole-cabbage kimchi highlights why it is the ultimate beginner and weeknight choice:
| Feature | Mak-Kimchi (This Recipe) | Tongbaechu-Kimchi (Traditional) |
|---|---|---|
| Cabbage Prep | Cut into bite-sized squares before salting | Kept in whole intact halves or quarters |
| Salting & Brining Time | Fast: 30–45 minutes | Slow: 6–12 hours (often overnight) |
| Seasoning Application | Tossed and massaged in a bowl like salad | Rubbed leaf-by-leaf between each layer |
| Serving Convenience | Ready to serve straight from the jar | Must be sliced with kitchen shears before serving |
| Ideal Enjoyment | Everyday banchan, ramen, fried rice, quick meals | Long-term winter storage (Kimjang) & ceremonial feasts |
Critical Technique Parameter: Thorough Moisture Draining
The single most frequent beginner pitfall is leaving excess wash water on the rinsed cabbage. Water dilutes your vibrant seasoning paste and causes the kimchi to become soggy rather than delightfully crisp. After rinsing 2–3 times, allow the cabbage to drain in a colander for 20 minutes, or spin in batches using a salad spinner!
Pro Tips & Fermentation Insights
- 1. Use Authentic Gochugaru: Do not substitute Korean red chili powder with standard Western chili powder or cayenne pepper. Gochugaru has a distinct coarse grind, vibrant red hue, and mild, fruity smokiness that is irreplaceable in Korean gastronomy.
- 2. The Natural Fruit Sweetness Secret: The pear or apple in the aromatics paste provides more than gentle sweetness—its natural fructose serves as prime nourishment for beneficial lactic acid bacteria, jumpstarting robust, healthy fermentation.
- 3. Hands & Glove Safety: Always wear disposable food-safe kitchen gloves when massaging the Gochugaru and aromatics paste into the cabbage to prevent intense chili burn on your fingers.
- 4. Eliminating Air Pockets: When transferring to glass jars, pack the cabbage down firmly with a clean wooden spoon or knuckles. Banishing air pockets and keeping the cabbage submerged under its own released juices prevents unwanted surface oxidation.
Serving, Banchan & Culinary Pairings
Freshly made Mak-kimchi is bright, crunchy, and slightly sweet on day one (*geotjeori* style). After 1 to 2 days at room temperature, it develops that signature effervescent tang and gut-friendly probiotics. Pair your homemade kimchi with:
- Steaming Short-Grain Rice: The ultimate classic comfort pairing topped with a fried egg and roasted seaweed.
- Noodles & Ramen: Adds acidity and crunch that cuts through rich broths like Tonkotsu or Shin Ramyun.
- Kimchi Fried Rice (Bokkeumbap): As your kimchi matures in the fridge over weeks, its deepening tang makes it world-class for fried rice and savory stews (Kimchi Jjigae).
- Crispy Savory Pancakes (Pajeon): Perfect side banchan to accompany hot, pan-fried Korean savory pancakes.
Ingredients
-
1 kg
-
½ cup
-
7–8 pieceSubstitutes for Scallions:Chives Ratio: 1:1Shallots Ratio: 1:1
-
¼ piece
-
½ piece
-
10Substitutes for Garlic:Garlic Powder Ratio: 1/8 tsp powder = 1 cloveShallots Ratio: 1:1
-
1 pieceSubstitutes for Fresh Ginger:Ground Ginger Ratio: 1/4 tsp ground = 1 tbsp fresh
-
½ cup
-
3 tbsp Fish
Watch How to Make It
1. 1. Brine the Napa Cabbage
Drain Thoroughly: The biggest mistake beginners make is leaving too much water on the rinsed cabbage. Excess water will dilute your seasoning and make the kimchi soggy rather than crisp. Use a salad spinner or let it sit in a colander for a good 20 minutes if needed.
2. 2. Prepare the Seasoning Base
The Fruit Secret: The pear or apple isn't just for flavor. The natural sugars provide essential food for the lactic acid bacteria, ensuring a healthy, active, and delicious fermentation process!
3. 3. Mix the Cabbage and Seasoning
Use Authentic Gochugaru: Do not substitute the red chili powder with standard Western chili powder or cayenne pepper. Gochugaru has a specific smoky, sweet heat that is irreplaceable in Korean cooking.
4. 4. Storage and Fermentation
Room-Temperature Kickstart: Keep the jar tightly sealed at room temperature for 1 to 2 days until tiny bubbles appear, then transfer to the refrigerator where flavors deepen over weeks.
All Steps Completed!
You've successfully finished cooking this recipe.
Directions
Step 1: 1. Brine the Napa Cabbage
Start by chopping the Napa cabbage into manageable, bite-sized pieces. Place the chopped cabbage in a large mixing bowl. Sprinkle the 1/2 cup of salt evenly over the layers of cabbage. Let it sit for about 30 to 45 minutes, turning it occasionally, until the rigid white stems have softened and bend easily without snapping. Once softened, rinse the cabbage thoroughly in clean, cold water 2-3 times to remove excess salt. Drain it exceptionally well to remove as much moisture as possible.
Drain Thoroughly: The biggest mistake beginners make is leaving too much water on the rinsed cabbage. Excess water will dilute your seasoning and make the kimchi soggy rather than crisp. Use a salad spinner or let it sit in a colander for a good 20 minutes if needed.
Step 2: 2. Prepare the Seasoning Base
While your cabbage is draining, prepare your aromatics. In a blender or food processor, combine the onion, pear (or apple), garlic cloves, ginger, and anchovy fish sauce. Blend until you achieve a smooth puree.
The Fruit Secret: The pear or apple isn't just for flavor. The natural sugars provide essential food for the lactic acid bacteria, ensuring a healthy, active, and delicious fermentation process!
Step 3: 3. Mix the Cabbage and Seasoning
In a large mixing bowl, pour your freshly blended seasoning over the drained cabbage. Add the 1/2 cup of red chili powder (Gochugaru). Using your hands (wearing a food-safe glove is highly recommended to protect your skin from the chili!), thoroughly mix and massage the seasoning into the cabbage pieces until every leaf is beautifully coated in red. Finally, add your chopped green onions and gently toss them into the mixture.
Use Authentic Gochugaru: Do not substitute the red chili powder with standard Western chili powder or cayenne pepper. Gochugaru has a specific smoky, sweet heat that is irreplaceable in Korean cooking.
Step 4: 4. Storage and Fermentation
Pack the kimchi tightly into an airtight glass jar or food-safe container, pressing down firmly to remove air pockets. Leave the container sitting at room temperature for about 1 to 2 days to kickstart the fermentation process. You should start to see small bubbles forming. Once it reaches your preferred level of tanginess, transfer the kimchi to the refrigerator, where it will continue to ferment slowly and deepen in flavor over the coming weeks!
Room-Temperature Kickstart: Keep the jar tightly sealed at room temperature for 1 to 2 days until tiny bubbles appear, then transfer to the refrigerator where flavors deepen over weeks.
What's Your Reaction?

I’m a young Korean food enthusiast who loves learning from different Korean chefs, discovering new recipes, and exploring the many flavors of Korean cuisine. I especially enjoy using Recipinboard’s Recipe Boards & Collections to organize the dishes that inspire me, while the Meal Planner helps me plan what I want to cook and try next. I’m always excited to learn, cook, and discover something delicious.
Related Recipes
 Life Style
⏱ 60 mins
Life Style
⏱ 60 mins
Laing Bicol
Laing, or Pinangat in Bicol, is Bicol's pride - dried or fresh taro leaves slow-co...
 Filipino Breakfast
⏱ 17 mins
Filipino Breakfast
⏱ 17 mins
Chicken Inasal with Garlic Java Rice & Atchara
There are two kinds of grilled chicken in the Philippines. There's the one you eat...
 Donuts, Churros & Fritters
⏱ 60 mins
Donuts, Churros & Fritters
⏱ 60 mins
Custard Cream Donuts — Classic Vanilla & Chocolate
Warm, soft, and bursting with rich, silky cream—there’s a reason custard donuts ar...
 Cakes & Layer Cakes
⏱ 43 mins
Cakes & Layer Cakes
⏱ 43 mins
Strawberry Swiss Roll: A Pillowy Pink Dream
A bakery-worthy centerpiece featuring a pastel-pink, cloud-soft chiffon sponge rol...
 Dinner Rolls & Buns
⏱ 50 mins
Dinner Rolls & Buns
⏱ 50 mins
Golden Cheesy Garlic Swirl Rolls (Bakery-Style Pull-Apart Bread)
Cloud-soft enriched milk dough swirled with fragrant garlic herb butter, layered w...
 Cookies & Shortbread
⏱ 40 mins
Cookies & Shortbread
⏱ 40 mins
NYC-Style Chunky Chocolate Chip Cookies (Classic, Red Velvet &...
Massive, gourmet Levain-style cookies featuring one master dough transformed into ...





Comments (0)