

The Ultimate No-Knead Garlic Butter Focaccia
An easy, foolproof no-knead garlic butter focaccia boasting an ultra-crispy golden crust, massive airy bubbles, and rich roasted garlic confit butter pooled in deep dimples. Better than your local bakery!
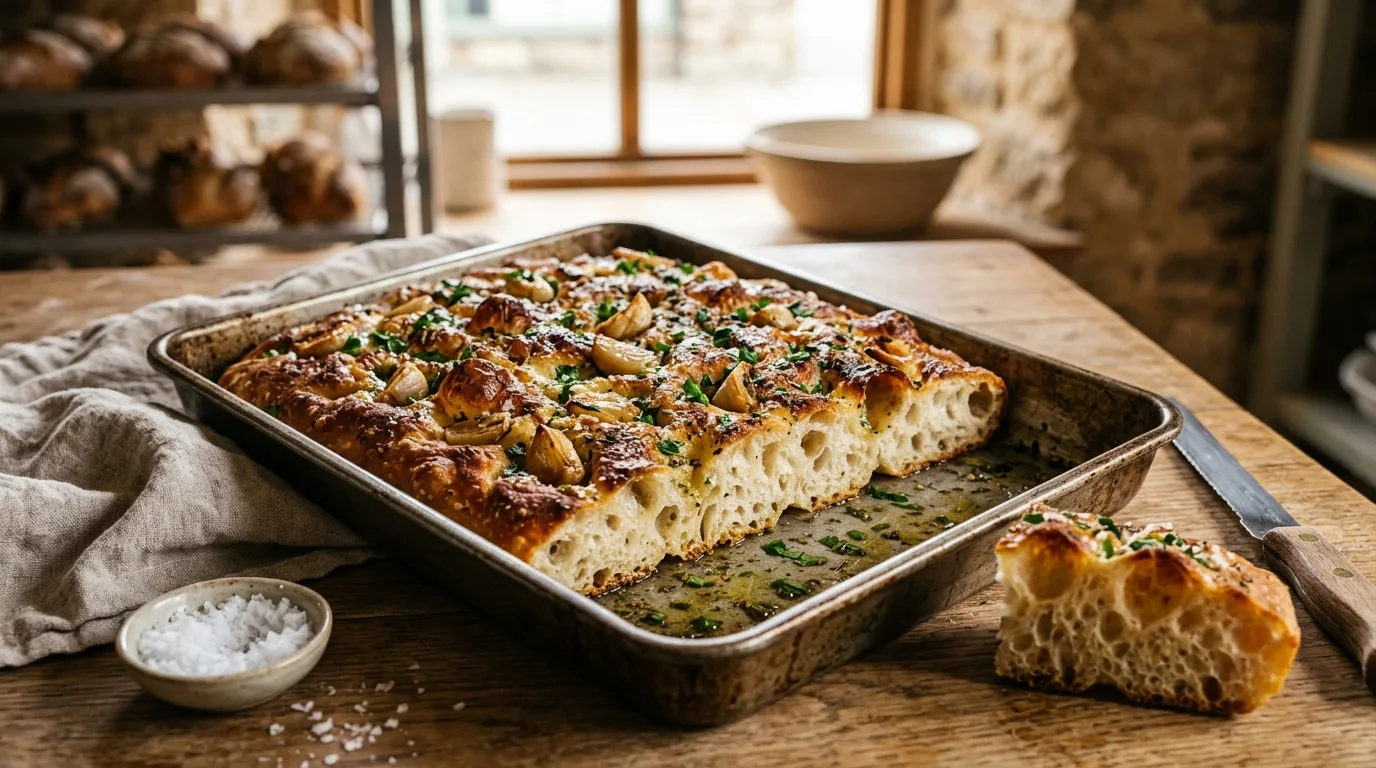
Have you ever dreamed of pulling a glistening, bakery-quality loaf of artisan bread straight from your own oven, but felt intimidated by rigorous kneading schedules and fussy starters? This foolproof No-Knead Garlic Butter Focaccia is about to revolutionize the way you bake at home forever.
Featuring an ultra-crispy, olive-oil-fried bottom crust, a cloud-like interior riddled with dramatic open air pockets, and pools of rich, caramelized roasted garlic confit butter nestled inside deep dimples, this loaf delivers unmatched savory indulgence. Whether you are a seasoned sourdough aficionado or turning on your oven for the very first time, this approachable method guarantees results that surpass your local high-end bakery.
The Magic of High Hydration & Autolyse
Traditional bread making relies on mechanical kneading to cross-link gluten proteins into a strong web. In contrast, this no-knead focaccia harnesses enzymatic autolysis and time. By formulating the dough at approximately 82% hydration (500g water to 550g flour), water molecules effortlessly penetrate the flour proteins.
During the gentle resting periods and three subsequent stretch-and-fold cycles, gluten naturally aligns into an exceptionally elastic network. This high water content turns into trapped steam during baking, expanding violently in the high-heat oven to forge those jaw-dropping, giant honeycomb bubbles.
Baker's Scale Recommendation
For the most consistent and reproducible bakery results, we strongly recommend weighing your ingredients using a digital kitchen scale in grams. Bread flour compacts easily in measuring cups, which can inadvertently add extra flour and dry out your dough.
The Secret Weapon: Slow-Roasted Garlic Confit Butter
What elevates this recipe above standard herb breads is the homemade garlic confit butter sauce. Raw garlic baked on top of bread can quickly char, turning unpleasantly bitter.
Instead, two whole bulbs of garlic are gently slow-roasted in olive oil until the pungent allicin compounds transform into luscious, sweet, caramelized cloves. Whipped together with softened butter, fresh parsley, and a hint of red chili flakes, this golden elixir is massaged directly into the dimples before baking and brushed again over the sizzling crust the moment it emerges from the oven.
Pan Sizing & Equipment
The ideal baking pan for this batch is 23 × 34 × 3 cm (approximately 9 × 13 inches, standard quarter sheet or brownie pan). Metal pans (especially dark or heavy-gauge aluminum) conduct heat rapidly, creating the signature blistered, crispy fried crust that focaccia is world-famous for.
| Pan Material | Crust Result | Baking Recommendation |
|---|---|---|
| Metal / Aluminum Sheet Pan | Crisp, deeply golden, blistered bottom | Ideal choice. Heat transfers instantaneously to create a crisp bottom crust. |
| Cast Iron Skillet (12-inch) | Thick, crunchy, pan-fried crust | Fantastic option. Preheat slightly or bake on lowest oven rack. |
| Glass or Ceramic Baking Dish | Softer, paler bottom crust | Add 3 to 5 minutes to bake time; glass conducts heat more slowly. |
Pro Baker Tips for Foolproof Success
- 1. Keep It Wet & Sticky: Do not be afraid of the wet dough. Never add extra flour when mixing. Wetter dough equals larger bubbles and a lighter, airier crumb.
- 2. Use High-Protein Bread Flour: Bread flour (12%–14% protein) provides the gluten strength needed to trap gas and maintain vertical lift.
- 3. Wet Your Hands for Handling: When performing stretch-and-folds, always wet your hands with tap water rather than oil. Water creates a frictionless barrier without altering the dough formulation.
- 4. Handle Like a Pillow: Never punch down this dough. When easing it into the baking tray, preserve the trapped carbon dioxide bubbles with gentle care.
- 5. Respect the Final Proof: Allow the dough to relax and rise in the pan for the full 45 to 60 minutes until jiggly like gelatin before dimpling.
Storage & Reheating
Focaccia is best savored warm on the day it is baked. To store leftovers, wrap tightly in foil or store in an airtight container at room temperature for up to 2 days, or freeze individual sliced squares for up to 2 months.
To Reheat: Warm slices in a 375°F (190°C) oven or toaster oven for 5 to 7 minutes. The butter will sizzle, restoring the exterior to its original crunchy glory while keeping the crumb pillowy soft.
Ingredients
-
500 grams (g)
-
2 tspSubstitutes for Instant Dry Yeast:Active Dry Yeast Ratio: 1:1 (bloom first)
-
1 tbsp
-
1 tsp
-
40 mlSubstitutes for Extra Virgin Olive Oil:Avocado Oil Ratio: 1:1
-
550 grams (g) Gluten
-
2 wholeSubstitutes for Garlic:Garlic Powder Ratio: 1/8 tsp powder = 1 cloveShallots Ratio: 1:1
-
2 tbsp
-
100 grams (g) Dairy
-
2 tbspSubstitutes for Fresh Parsley:Chervil Ratio: 1:1
-
1 tspSubstitutes for Garlic:Garlic Powder Ratio: 1/8 tsp powder = 1 cloveShallots Ratio: 1:1
-
to taste
-
0.33 tsp
-
1 tsp
1. Mix the Wet Ingredients
Using lukewarm water around 100°F–105°F (38°C) gently activates the yeast without harming the living cultures.
2. Add Bread Flour & Form Shaggy Dough
Resist the urge to add extra flour! A wetter, stickier dough is the secret to an open, cloud-like bakery crumb.
3. First Dough Rest & Autolyse
Autolysis does the heavy lifting of kneading naturally through enzymatic action while you relax.
4. Slow-Roast the Garlic Confit
Save every drop of the leftover roasted garlic olive oil; it adds sensational aroma when brushed over the dough before dimpling.
5. Stretch & Fold Technique (3 Rounds)
Always use wet fingers instead of oiled hands during stretch-and-folds; water prevents sticking without adding excess grease to the dough.
6. Whip the Roasted Garlic Butter Sauce
Ensure your butter is properly softened at room temperature so it incorporates smoothly with the roasted garlic into a velvety spread.
7. Prepare Baking Pan & Ease Dough In
Handle the dough like a pillow—never punch it down or stretch it aggressively, as trapped gas bubbles create the signature crumb.
8. Final Proof Until Light & Bubbly
A gentle nudge of the pan should make the dough wobble like gelatin. Avoid over-proofing, which can cause bubbles to deflate in the oven.
9. Dimple Dough & Top with Garlic Butter
Push your fingertips all the way to the bottom pan surface without puncturing through; this prevents the loaf from doming and keeps the garlic butter pooled inside.
10. Bake to Crispy, Blistered Perfection
If you prefer an extra-crispy, fried-like bottom crust, bake the focaccia on the lowest oven rack for the final 3 minutes.
11. Finishing Touch & Slicing
Never leave hot focaccia in the metal pan to cool completely; trapped steam will soften your crunchy bottom crust.
All Steps Completed!
You've successfully finished cooking this recipe.
Directions
Step 1: Mix the Wet Ingredients
In a large mixing bowl, combine the lukewarm water (500g), instant dry yeast (2 tsp), honey (1 tbsp), pink salt (1 tsp), and extra virgin olive oil (40 ml). Whisk thoroughly with a wire whisk until the honey is fully dissolved and the yeast is evenly distributed.
Using lukewarm water around 100°F–105°F (38°C) gently activates the yeast without harming the living cultures.
Step 2: Add Bread Flour & Form Shaggy Dough
Add the bread flour (550g) directly into the wet ingredients. Using a Danish dough whisk, wooden spoon, or clean hands, mix until all dry flour is absorbed. The dough will look very wet, sticky, and shaggy—this high-hydration wetness is essential for giant air bubbles.
Resist the urge to add extra flour! A wetter, stickier dough is the secret to an open, cloud-like bakery crumb.
Step 3: First Dough Rest & Autolyse
Cover the mixing bowl securely with a damp kitchen towel or plastic wrap. Let the dough rest undisturbed at room temperature for 30 minutes. This autolyse resting period allows the flour proteins to naturally hydrate and begin forming gluten bonds without any kneading.
Autolysis does the heavy lifting of kneading naturally through enzymatic action while you relax.
Step 4: Slow-Roast the Garlic Confit
While the dough rests, peel all the garlic cloves from the 2 bulbs (about 20–25 cloves). Place them into a small oven-safe ramekin or baking dish and submerge completely with olive oil. Bake at 350°F (175°C) for 25 to 30 minutes until the cloves are completely tender, golden, and sweet, then set aside to cool slightly.
Save every drop of the leftover roasted garlic olive oil; it adds sensational aroma when brushed over the dough before dimpling.
Step 5: Stretch & Fold Technique (3 Rounds)
Wet your hands with clean water to prevent sticking. Reach under one side of the dough, gently stretch it upwards, and fold it over its center. Rotate the bowl 90 degrees and repeat for all four sides. Let the dough rest 20 minutes, then repeat the stretch and fold two more times (3 rounds total, resting in between).
Always use wet fingers instead of oiled hands during stretch-and-folds; water prevents sticking without adding excess grease to the dough.
Step 6: Whip the Roasted Garlic Butter Sauce
In a medium bowl or small food processor, combine the softened butter (100g) with the roasted garlic cloves. Mash and blend until smooth and creamy. Stir in the chopped fresh parsley (2 tbsp), garlic powder (1 tsp), 1/3 tsp black pepper, red chili flakes (1 tsp), a pinch of salt to taste, and 1 to 2 tablespoons of the leftover garlic confit oil. Blend until silky.
Ensure your butter is properly softened at room temperature so it incorporates smoothly with the roasted garlic into a velvety spread.
Step 7: Prepare Baking Pan & Ease Dough In
Drizzle 2 to 3 tablespoons of extra virgin olive oil generously into an ideal 23 × 34 × 3 cm baking pan (or line with parchment paper and oil). Gently tip and ease the relaxed dough into the pan, handling it very gently to preserve all the delicate, trapped fermentation gas bubbles.
Handle the dough like a pillow—never punch it down or stretch it aggressively, as trapped gas bubbles create the signature crumb.
Step 8: Final Proof Until Light & Bubbly
Cover the pan lightly with an inverted baking sheet or oiled plastic wrap. Allow the dough to proof and rise in a warm spot for 45 to 60 minutes until it expands to fill the pan, jiggles when shaken, and is covered in large surface bubbles.
A gentle nudge of the pan should make the dough wobble like gelatin. Avoid over-proofing, which can cause bubbles to deflate in the oven.
Step 9: Dimple Dough & Top with Garlic Butter
Preheat your oven to 230°C (450°F). Drizzle olive oil over the proofed dough and coat your fingers. Press your fingertips straight down deep into the dough until you touch the bottom of the pan to create classic focaccia dimples. Spread the luscious garlic butter sauce all across the top, then dimple once more so the butter sinks deep into the pockets.
Push your fingertips all the way to the bottom pan surface without puncturing through; this prevents the loaf from doming and keeps the garlic butter pooled inside.
Step 10: Bake to Crispy, Blistered Perfection
Bake in the preheated 230°C (450°F) oven for 18 to 20 minutes, rotating the pan halfway through, until the crust is deeply golden brown, blistered with crispy edges, and the loaf sounds hollow when lightly tapped.
If you prefer an extra-crispy, fried-like bottom crust, bake the focaccia on the lowest oven rack for the final 3 minutes.
Step 11: Finishing Touch & Slicing
Remove the hot focaccia from the oven. Immediately brush any remaining garlic butter sauce or garlic oil over the sizzling crust. Let it rest in the pan for 10 minutes, then transfer to a wire cooling rack so the bottom stays crispy. Slice into warm, fragrant squares and enjoy!
Never leave hot focaccia in the metal pan to cool completely; trapped steam will soften your crunchy bottom crust.
What's Your Reaction?

I’m a home cook and food enthusiast who loves discovering new recipes, exploring different flavors, and finding dishes that inspire me to cook. I enjoy sharing and curating my food interests here on Recipinboard because I love its interactive cooking experience—it makes exploring recipes and actually getting into the kitchen more engaging and enjoyable. I’m always on the lookout for delicious dishes worth trying, making, and sharing.
Related Recipes
 Life Style
⏱ 60 mins
Life Style
⏱ 60 mins
Laing Bicol
Laing, or Pinangat in Bicol, is Bicol's pride - dried or fresh taro leaves slow-co...
 Filipino Breakfast
⏱ 17 mins
Filipino Breakfast
⏱ 17 mins
Chicken Inasal with Garlic Java Rice & Atchara
There are two kinds of grilled chicken in the Philippines. There's the one you eat...
 Asian Salads
⏱ 45 mins
Asian Salads
⏱ 45 mins
Kimchi — Easy Mak-Kimchi Style
If you have ever been intimidated by the complex process of making traditional Kor...
 Donuts, Churros & Fritters
⏱ 60 mins
Donuts, Churros & Fritters
⏱ 60 mins
Custard Cream Donuts — Classic Vanilla & Chocolate
Warm, soft, and bursting with rich, silky cream—there’s a reason custard donuts ar...
 Cakes & Layer Cakes
⏱ 43 mins
Cakes & Layer Cakes
⏱ 43 mins
Strawberry Swiss Roll: A Pillowy Pink Dream
A bakery-worthy centerpiece featuring a pastel-pink, cloud-soft chiffon sponge rol...
 Dinner Rolls & Buns
⏱ 50 mins
Dinner Rolls & Buns
⏱ 50 mins
Golden Cheesy Garlic Swirl Rolls (Bakery-Style Pull-Apart Bread)
Cloud-soft enriched milk dough swirled with fragrant garlic herb butter, layered w...







Comments (0)